
TECHNOTES
Using the MicroRT™System
Using the MicroRT™ System for Room- and Low-Temperature Crystallography
Click here for a printable pdf file of these instructions.
MiTeGen’s MicroRT™ capillaries are made of clear thin-wall plastic that gives less background scatter than regular quartz X-ray capillaries. They neither break nor shatter, and can be cut with either scissors or razor blades. They are pre-sealed at one end, so you don’t need to use sealing wax. They are compatible with MiTeGen’s goniometer bases, which are designed to capture the MicroRT™ capillaries. Our goniometer bases come in a variety of styles to provide compatibility with all sample changing hardware. Our MicroRT™ Aligner allows you to slide the capillary past your crystal onto any of our goniometer bases with precision and speed. If you aren’t use the Aligner, we recommend our GB-B3/B3S style bases and their reusable counterparts.
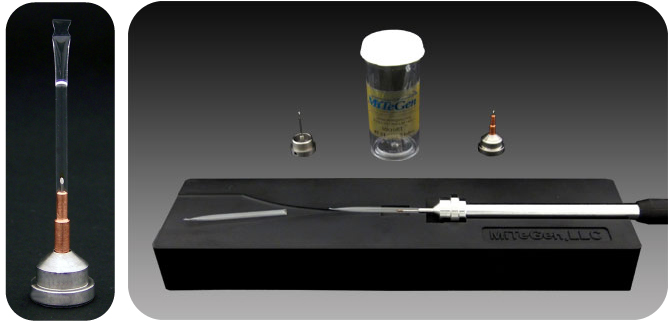
Instructions:
- To prepare a sample, start by injecting your environment-stabilizing solution (e.g., mother liquor or reservoir solution) into the MicroRT™ capillary tube using a pipette with a gel-loading tip. To prevent gas bubbles between the end and the liquid plug, inject the solution all the way down to the sealed end. This will prevent the liquid plug from moving during temperature changes and large movements.
- The plug size should be 10-40 μl, this will allow the crystal to remain fully hydrated for several days. (There is evaporation of ~80 nl/hour through the walls of the capillary tube)
- Mount your crystal on a MicroMount™, MicroLoop™, MicroMesh™ or MicroGripper™ that’s been inserted into a MiTeGen goniometer base. Remove excess liquid to prevent sample slippage, however too little liquid will dry out the crystal and cause it to fall off the mount. An alternative is to use a MicroGripper™ to securely hold your crystal.
- Attach your MicroMount™+base to a magnetic wand, and place it and the MicroRT™ capillary in the MicroRT™ Aligner. Slide the capillary tubing down the channel, past the crystal and onto the base. If you don’t have a MicroRT™ Aligner, work under a magnifier or microscope, and draw the MicroRT™ capillary tubing down over the crystal and mount and onto the goniometer base, being careful not to bump the crystal. To make a better seal between the capillary and base, apply a tiny amount of grease (e.g., Dow-Corning #976V high vacuum grease) or oil to the capillary-capturing tip of the goniometer base. This generally isn’t necessary if you’re going to collect data within the next few hours.
- Align the crystal manually or using an autoalignment system, just as you would when not using the MicroRT™ capillary.
- After you’ve collected the desired number of frames, slide the MicroRT™ capillary off. You can then soak the crystal in any desired solution or replace the liquid plug with another solution (e.g., to vapor diffuse in a small molecule or to dehydrate the crystal), and then draw the capillary back over the crystal and take more frames.
- Once you’ve collected your room temperature frames, just pop off the MicroRT™ capillary, plunge the mount and crystal into your favorite liquid cryogen, and you’re ready to collect a low-temperature data set.
If you want store your crystals for longer than a few days, replace the MicroRT™ tubing with any 2 mm ID glass or thick-walled plastic tubing.
The MicroRT™ system can also be used with conventional nylon loop mounts. However, since the loops can have random positions and orientations relative to the pin and tube axis, the chance of bumping the loop and crystal while drawing the tubing is much greater.
Comments or suggestions? Please contact us!